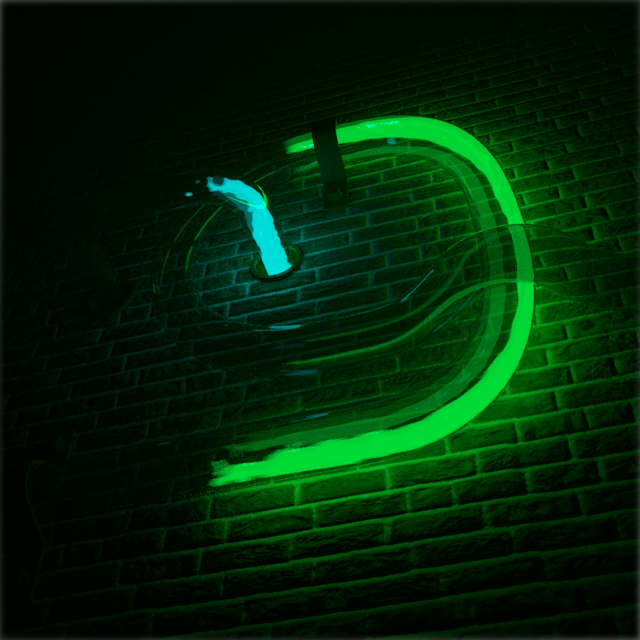
Most of the motion is simulated secondary animation, with connectors and springs.Made in Cinema 4D and rendered with Arnold.

Rendered out in C4D with Arnold
Pixel River, part 1 + 2
Simulated with RealFlow | C4D and rendered out using only what the viewport sees at 120 pixels wide
RealFlow | Cinema 4D 2.0 Tutorial
Bubbles in viscous fluid tutorial
Getting bubbles inside a viscous liquid is not quite straight forward with RealFlow|C4D
In this tutorial I will explain my method behind this video, using cloners and matrix object together with RealFlow, all inside C4D.
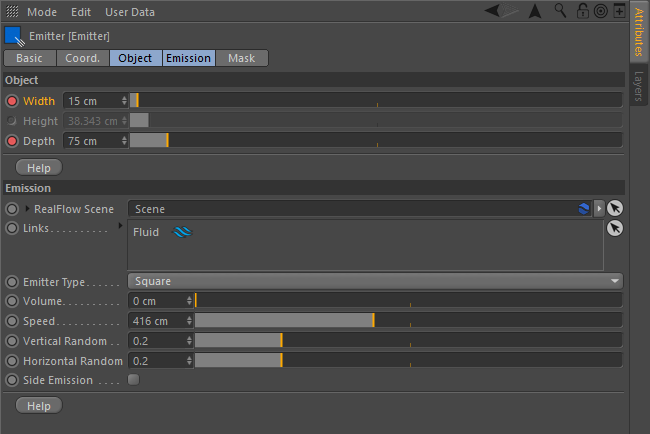
You want to start out getting the viscous fluid just right, if you are making something like honey, there are a lot of different combinations of settings you can use, considering it has various looks and movement depending on temperature and other factors.
![]()
Resolution doesn’t need to be crazy high, and if you do not know what one of the settings does, you can read about every parameter here:
http://support.nextlimit.com/display/RFC4D2/
Now that we have our fluid settings, we need to have some actual particles.
In my example I am using a square emitter, and pointing it down on a floor with a collider and gravity. But I think you can use this method in many ways.
In addition to my settings, I have applied a vibrate tag to the emitter, to make it randomly rotate around all its axes up to 20°
This is to get the viscous fluid to fold over itself.
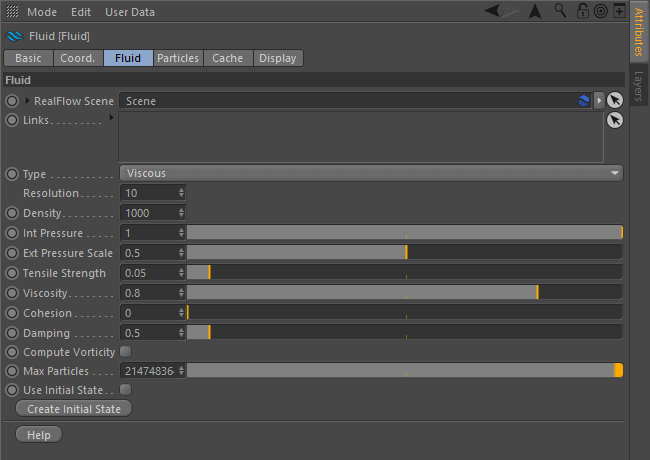
Below are my settings for the emitter:
![]()
I have keyframed the emitter to scale down in the end, I
do this because I feel like it gives a better result than keyframing the speed variable to stop it from emitting.
To get rid of holes in the simulation, I use a sheeter daemon with a max age of 1, so that I don’t generate too many extra particles.
Now the solver settings.
Initially the solver settings might be something like 2/2 substeps and 20/20 iteration. These settings doesn’t give us any good viscous results, mostly because of the iterations.
The more iterations, the more viscous it would act. But turning up the iterations doesn’t do it alone, some extra substeps will help with particles acting strange or spazzing out.
So i ended up with these settings in the scene solver:
Min Substeps: 6
Max Substeps: 6
Min Iterations: 60
Max Iterations: 60
If this produces a nice result, then we are ready to cache both the particles and the mesh. The settings for the mesh is mostly default, low resolution with a little smoothing is more than good enough, but if you feel like it gives some pointy edges, you can choose low-medium, but make sure to increase the smoothing even more then.
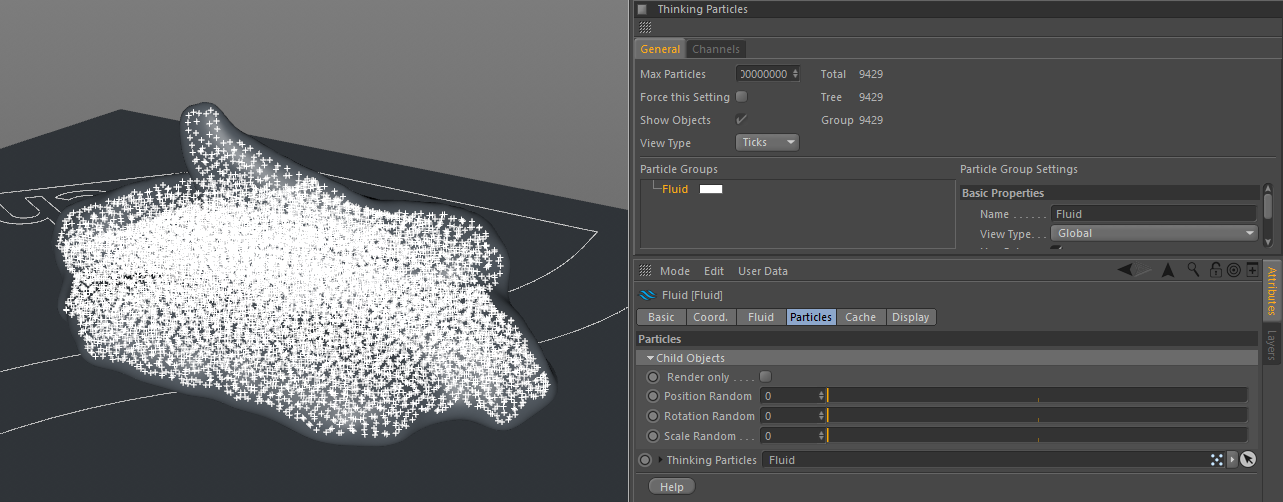
To start making bubbles, we need to make all the simulated particles into Thinking Particles, you can find the settings for Thinking Particles under the Simulate tab on the top.
You can use the default group or make a new particle group and drag it into the Thinking Particles settings inside the fluid settings.
![]()
Now we need to make a Matrix object, you can find it under the mograph menu on top.
Put the matrix object to object mode and drag the same Thinking Particles group that the fluid had, into the object field in the Matrix.
This will produce boxes on all the particles, which we will use as a guide for a regular Mograph cloner. Matrices doesn’t render.
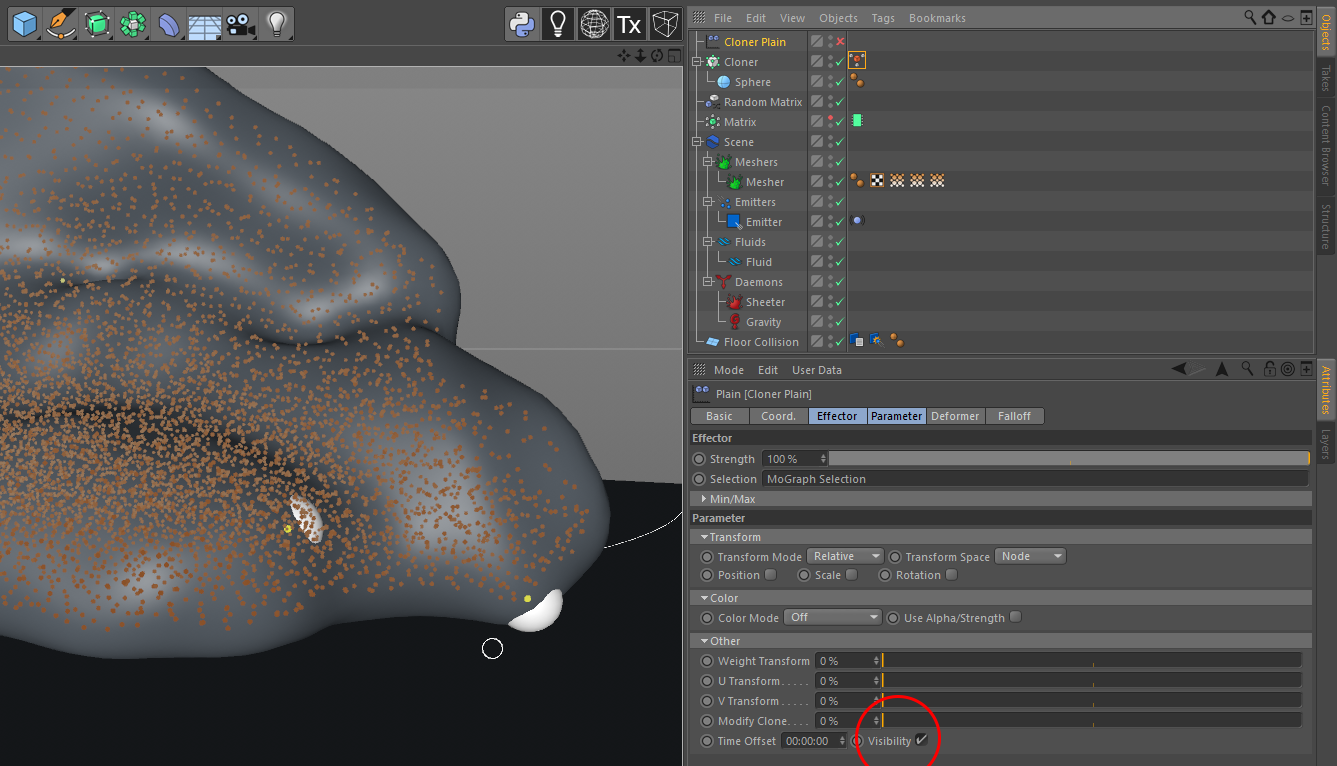
While having the Matrix Object selected, add a random mograph effector to it. With this we will randomly remove a lot of the matrices.
In the parameters tab, we don’t want anything other than Visibility checked. In the effector tab of the random effector, you want to edit the Min/Max parameters.
I put the maximum at 53% and then use the minimum to adjust how many it will remove. It will start to remove more down at -200%
![]()
When you feel you have the right amount, throw a MoGraph Cache Tag on the Matrix Object from the Tags menu, and bake it. This makes it so that the matrices never change which particle they are attached to.
A couple of steps left, and the next thing to do is make a MoGraph cloner. Add a sphere, add it to the cloner, and tell the cloner to clone on the Matrix Object by changing it to object mode. Scale the spheres down to a size relative to a bubble.
After you have scaled them down to a bubble size, you might have noticed that some of them stick a bit out from the fluid, which will give us unwanted results when we finally render it.
I have several ways of dealing with those, like using an instance of the mesh, shrinking it with a deformer and hide everything that is outside the instanced mesh. But by far the easiest is to have the matrices cached, so that the particles never changed and then you can selectively remove some.
To do that, have the MoGraph cloner selected, and under the MoGraph tab you find the MoGraph selection tool. Using this will suddenly show all matrices, even the ones hidden by the random, but if you move the camera around, you will be able to find all the dots that represents the bubbles that are sticking a bit outside the main mesh. After you have shift+selected all the ones that are popping out, make a plain effector and drop the selection tag that it created into the effectors selection. Then, like the matrix object, you want to only have visibility checked in the parameters. This hides all the ones you have selected with the MoGraph selection.
![]()
You should check through the whole timeline to see if there is any bad ones sticking too far out, having some showing in the flowing parts is not a big problem. If the plain effector is not working, it might be that the cloner does not have it in its own effector tab.
Another thing I stumbled over, when there is no particles for the matrix to clone on, its baked files will not include the frames with no particles, which will show as a red cache mark in the objects window.
The final step be to add a random effector to the cloner, this one should be set to scale (uniform) to give the bubbles different sizes.
And that’s it!
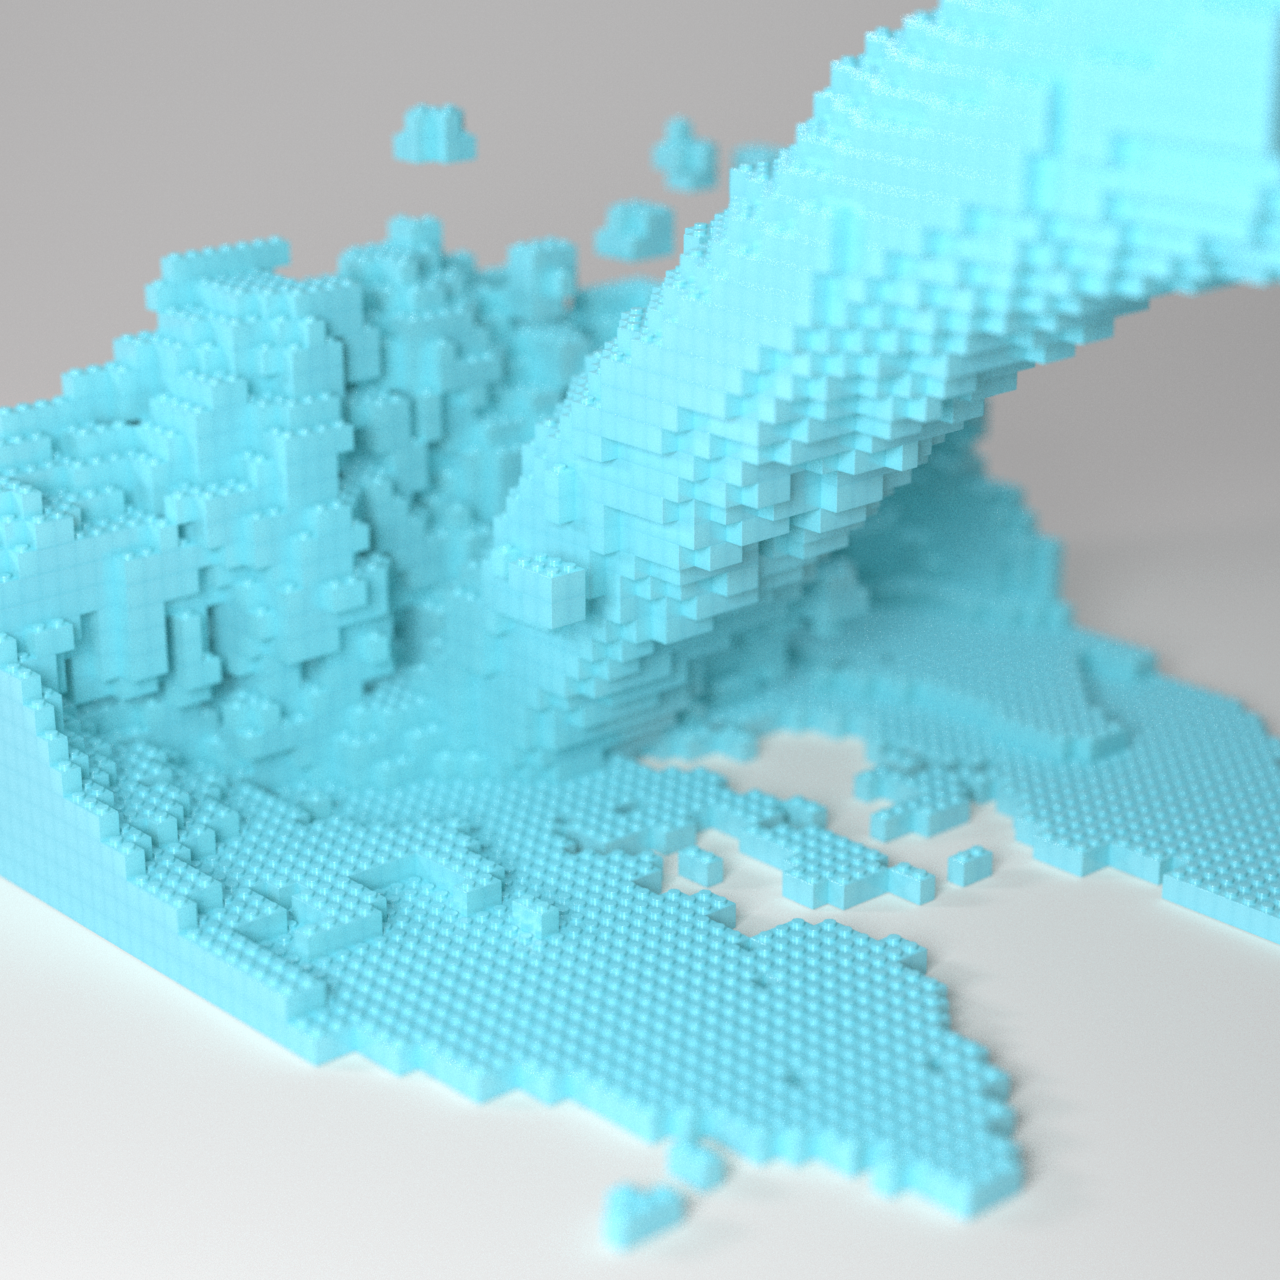
As for render, it all depends on the render engine, since they do nested refractions differently. For my render i used Arnold, utilizing the scatter in the transmission to get a more cloudy look. You can achieve the same thing with Absorption Distance and Color in transparency settings.
All feedback appreciated, and feel free to share your results with me!
If you want to tip with cryptocurrency, any amount is very appreciated.
Nano: xrb_3qntgupbsyxwamcd9pikxokqmeyxe6iw4jcxupz81ij7hbpbjf6ixzk7xypk
BTC: bc1qh44ex07pwssz9uc6hkh3wy80n3t767xwps4mzd
Getting bubbles inside a viscous liquid is not quite straight forward with RealFlow|C4D
In this tutorial I will explain my method behind this video, using cloners and matrix object together with RealFlow, all inside C4D.
You want to start out getting the viscous fluid just right, if you are making something like honey, there are a lot of different combinations of settings you can use, considering it has various looks and movement depending on temperature and other factors.
Resolution doesn’t need to be crazy high, and if you do not know what one of the settings does, you can read about every parameter here:
http://support.nextlimit.com/display/RFC4D2/
Now that we have our fluid settings, we need to have some actual particles.
In my example I am using a square emitter, and pointing it down on a floor with a collider and gravity. But I think you can use this method in many ways.
In addition to my settings, I have applied a vibrate tag to the emitter, to make it randomly rotate around all its axes up to 20°
This is to get the viscous fluid to fold over itself.
Below are my settings for the emitter:
I have keyframed the emitter to scale down in the end, I
do this because I feel like it gives a better result than keyframing the speed variable to stop it from emitting.
To get rid of holes in the simulation, I use a sheeter daemon with a max age of 1, so that I don’t generate too many extra particles.
Now the solver settings. Initially the solver settings might be something like 2/2 substeps and 20/20 iteration. These settings doesn’t give us any good viscous results, mostly because of the iterations.
The more iterations, the more viscous it would act. But turning up the iterations doesn’t do it alone, some extra substeps will help with particles acting strange or spazzing out.
So i ended up with these settings in the scene solver:
Min Substeps: 6
Max Substeps: 6
Min Iterations: 60
Max Iterations: 60
If this produces a nice result, then we are ready to cache both the particles and the mesh. The settings for the mesh is mostly default, low resolution with a little smoothing is more than good enough, but if you feel like it gives some pointy edges, you can choose low-medium, but make sure to increase the smoothing even more then.
To start making bubbles, we need to make all the simulated particles into Thinking Particles, you can find the settings for Thinking Particles under the Simulate tab on the top.
You can use the default group or make a new particle group and drag it into the Thinking Particles settings inside the fluid settings.
Now we need to make a Matrix object, you can find it under the mograph menu on top.
Put the matrix object to object mode and drag the same Thinking Particles group that the fluid had, into the object field in the Matrix.
This will produce boxes on all the particles, which we will use as a guide for a regular Mograph cloner. Matrices doesn’t render.
While having the Matrix Object selected, add a random mograph effector to it. With this we will randomly remove a lot of the matrices.
In the parameters tab, we don’t want anything other than Visibility checked. In the effector tab of the random effector, you want to edit the Min/Max parameters.
I put the maximum at 53% and then use the minimum to adjust how many it will remove. It will start to remove more down at -200%

When you feel you have the right amount, throw a MoGraph Cache Tag on the Matrix Object from the Tags menu, and bake it. This makes it so that the matrices never change which particle they are attached to.
A couple of steps left, and the next thing to do is make a MoGraph cloner. Add a sphere, add it to the cloner, and tell the cloner to clone on the Matrix Object by changing it to object mode. Scale the spheres down to a size relative to a bubble.
After you have scaled them down to a bubble size, you might have noticed that some of them stick a bit out from the fluid, which will give us unwanted results when we finally render it.
I have several ways of dealing with those, like using an instance of the mesh, shrinking it with a deformer and hide everything that is outside the instanced mesh. But by far the easiest is to have the matrices cached, so that the particles never changed and then you can selectively remove some.
To do that, have the MoGraph cloner selected, and under the MoGraph tab you find the MoGraph selection tool. Using this will suddenly show all matrices, even the ones hidden by the random, but if you move the camera around, you will be able to find all the dots that represents the bubbles that are sticking a bit outside the main mesh. After you have shift+selected all the ones that are popping out, make a plain effector and drop the selection tag that it created into the effectors selection. Then, like the matrix object, you want to only have visibility checked in the parameters. This hides all the ones you have selected with the MoGraph selection.
You should check through the whole timeline to see if there is any bad ones sticking too far out, having some showing in the flowing parts is not a big problem. If the plain effector is not working, it might be that the cloner does not have it in its own effector tab.
Another thing I stumbled over, when there is no particles for the matrix to clone on, its baked files will not include the frames with no particles, which will show as a red cache mark in the objects window.
The final step be to add a random effector to the cloner, this one should be set to scale (uniform) to give the bubbles different sizes.
And that’s it!
As for render, it all depends on the render engine, since they do nested refractions differently. For my render i used Arnold, utilizing the scatter in the transmission to get a more cloudy look. You can achieve the same thing with Absorption Distance and Color in transparency settings.
All feedback appreciated, and feel free to share your results with me!
All done inside Cinema4D, simulated with Realflow|C4D and rendered with Arnold Render
Have been diving deep into Realflow and Arnold render now over on my instagram, check it out!